Automatic Scheduled Emails - The Details
Automatic Scheduled Emails are emails that are automatically sent out based on payment-related due dates, check-in, check-out and booking creation dates.
For example, you can set up Payment Reminders and Past Due emails that are based on your custom Payment Due Date(s). You can also send out your arrival and departure instructions, cleaner information, and thank you notes to guests any number of days before or after Check-In dates, Check-Out dates and Booking Creation dates. Automatic Payment-Related Emails are a convenient way to remind your guests to pay upcoming amounts as well as past due amounts. Bookerville determines whether or not a payment-related email should be sent based on your Payment Schedule Template and payments received from guests up to that time. (We don't send Payment Due emails unless the amount is actually due or past due.)Automatic Triggered Emails are emails that are automatically sent when an event happens within the software.
For example, the email called "Guest Confirmation" is automatically sent when a guest makes a booking online and when a guest confirms a booking request (or Quote) sent by the owner / manager.Step 1: Enable Automatic Scheduled Emails
By default, the Automatic Scheduled Email feature is not enabled. To start using this feature, you must enable it first. (It's super easy!)- From your Master Calendar, click on a property name. This takes you to the "Property Setup" tab.
- Click the "Email Templates" tab, and locate the "Automatic Scheduled Emails" box (top-right).
- Click the "Enable Automatic Scheduled Emails" checkbox.
Step 2: Preparation - Review Your Payment Schedule Template
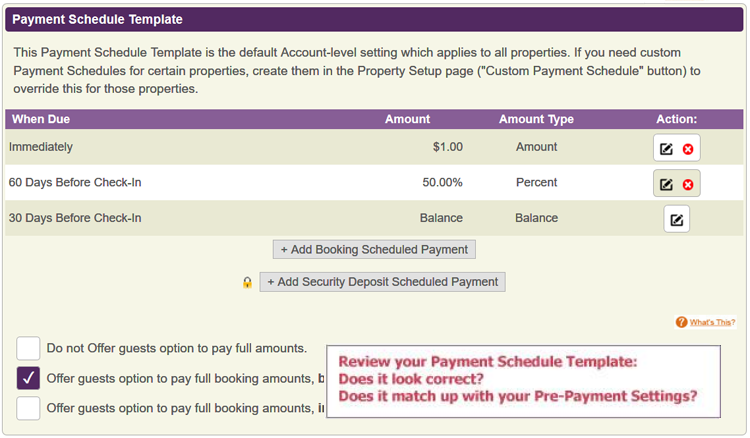
If you plan to use payment-related Automatic Scheduled Emails, you need to make sure your Payment Schedule Template is set up correctly.
- In your Bookerville Dashboard, go to your Account Settings tab.
- Scroll down to around the middle of the screen, and look for the Payment Schedule Template box.
-
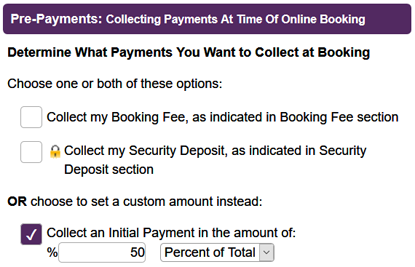
If you have a payment that is due immediately, like 50% due at time of booking, you should also check this setting on your Property Setup tab.
- To get to your Property Setup Tab, go to your Dashboard, and then click the name of the property you want to edit. This takes you to the Property Setup page.
- Scroll down to see your Pre-Payment settings (lower left).


Step 3: Start With The Bookerville Defaults
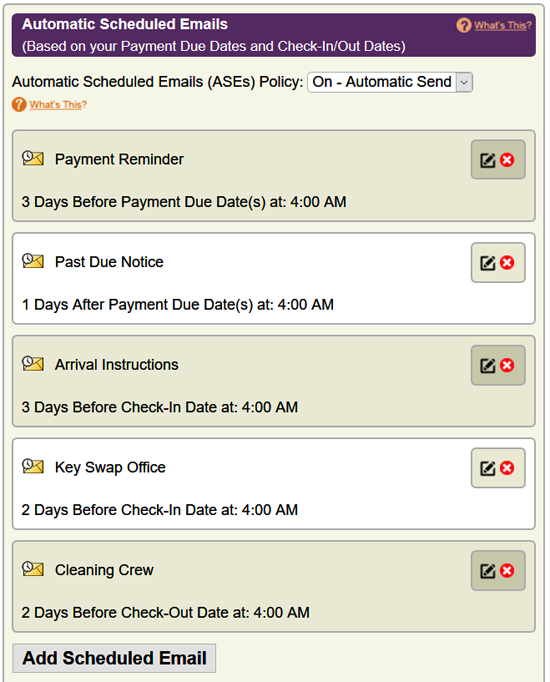
The easiest way to get started with Automatic Scheduled Emails is to just begin with the Bookerville default settings, and then add, remove, or customize from there. Click on a property name on your Master Calendar to get to the Property Setup page, then click the Email Templates tab. In the upper-right is the Automatic Scheduled Emails box. Depending on how recently you joined Bookerville, you may already have the default settings. To be sure, you can click the "Restore Default Scheduled Email Templates..." button at the bottom. This will automaticaly update your settings with the default set of scheduled emails, and will also restore any Email Templates that are needed for the default Automatic Scheduled Emails. Once you see the defaults restored, you can delete, modify, or add to them to suit your needs. As always, if you have any questions or need assistance, email us: support@bookerville.comStep 4: Adding, Removing, Changing - Customizing To Suit Your Needs
You can delete any Automatic Scheduled email by clicking the red X (next to the Edit button) at the right of each row. Click the Edit button to open up a row for editing. You can choose the Email Template from the drop-list. You can choose from the Booking Creation Date, a Payment Due Date (based on your Payment Schedule), the Check-In Date, or the Check-Out Date, and these in the drop-list. Enter the number of days, before or after the selected date to send the email. For example, you can send a Cleaning Crew Email Template 2 days before the Check-Out Date. Special rules apply to Automatic Scheduled Emails that are Payment Reminders or Past Due Notices (see below). Adding a new Automatic Scheduled Email is just as easy as editing an exsiting one - enter the information the same way, and click Save. You can also specify the hour of the day that each scheduled email will be sent. Note this also honors your local time zone, so be sure to specify that in your Dashboard >> Account Settings.Payment Reminders and Past Due Notices
Two of the default Email Templates and Automatic Scheduled Emails are Payment Reminders and Past Due Notices. When either of these are selected as the Email Template to send, the Date option is forced to be "Payment Due Date". It is important not to pester customers with unnecessary notices, so Bookerville has some safeguards in place:- Bookerville will not send any Payment Reminder or Past Due Notice if the customer is paid up through the payment schedule at that time. This is another reason why it is so important to make sure your Payment Schedule is accurate, and that you are diligent about recording payments received (if they are not being handled automatically.)
- Bookerville will not send more than one Payment Reminder and one Past Due Notice to a customer per scheduled date. So if there are two payments due the same day, only one Payment Reminder will be sent, and the content of the email will show the total that is due, along with a link to your payment page.
- The language and content of the standard Payment Reminder and Past Due Notice Email Templates is carefully crafted to handle a multitude of possible scenarios, and to strike a delicate balance between getting your customers to pay on time, while not offending them and also not getting flagged as spam. It is strongly recommended that you leave the contents of these Email Templates as-is for these reasons.
Optional: Apply to Existing Bookings
Now that you've got all your settings ready for future bookings, you might want to apply these settings to bookings already saved in the system. Otherwise, only new bookings will be handled with Automatic Scheduled Emails.- Click the "Apply Scheduled Emails to Existing Bookings" button at the bottom of the Automatic Scheduled Emails box.
- You will get a message informing you that the process will only generate new scheduled emails for bookings that are in the future. Bookings that are in the past will not get new scheduled emails generated for them.

Let's See What Happens at the Booking Level
Now that you've set up all your emails on a schedule, let's see how they look at the booking level.- From your Master Calendar, select a booking that is well enough into the future (so you can see the future scheduled emails.) Remember, you won't see scheduled emails with "to be sent" dates in the past.
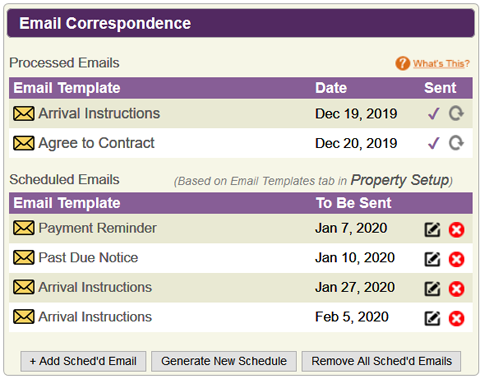
- Scroll down to see the Email Correspondence box at the lower right. This shows all scheduled and sent emails (even emails that were sent manually by clicking the "Generate Email" button). If you don't see any scheduled emails, then it means this booking was created before your Automatic Scheduled Emails were defined and enabled (see above). No worries - click the "Generate New Email Schedule" button at the bottom, and you should see the scheduled emails appear. Note that if any scheduled emails are calculated to be sent with a date in the past, they will appear in red. You can send these manually by clicking the "Send Now" button next to them.
The Email Correspondence area on the Booking Details page shows a nice, date-sorted list of emails that were sent from Bookerville - either manually, scheduled, or triggered. You can click on any of them to see the content of the email, and the recipients.
Need Help?
That's what we're here for! If you need any help or have any questions, please contact us at support@bookerville.com.


